Author Archives: Jenna

And the one shall become two

My grandfather Big Jake has been sending us large quantities of random groceries since the year 2004. Big Jake takes great pride in being resourceful and finding a ‘great deal,’ so frequently he will ship us marinades and dressings that have just passed their expiration date, cans and cans of food with dents in them that were sold for a few cents each after getting damaged in transit in some truck, and bulk quantities of flour, sugar, and oats. Big Jake also loves buying gigantic pieces of meat, and saves them in his own freezer until the time comes to provide for one of his grandchildren. And when it’s our turn, you never know what kind of bounty will spring forth. A duck. 10 million pounds of ground beef. A huge frozen mass of pink which upon further investigation ended up being 20-some odd chicken breasts. I call it ‘the pink plank,’ and I’m terrified of defrosting the monster. You can’t receive a Big Jake grocery shipment without having to pick your jaw up off the floor. And fill up your coat closet with the overflow that doesn’t fit in the pantry.

There have been joys and challenges, laughter and tears, butter sent through the postal service, and spaghetti sauce to last a lifetime, which I always need on hand to throw together my topmost go-to meal.

All this said, about 4 months ago Big Jake sent us two gigantic (almost 5 lb) cuts of meat called “arm roast.” The name of this slab of animal flesh made me pause to ponder some of the deeper questions of the universe. I mean, what the heck is an arm roast? Is there any situation in which you would say “that cow has a nice fat arm”? Aren’t they . . . legs? Any ranchers out there who can clarify this point?

I apologize for this illustration. It seemed a necessity at the time I made it.

Considering the package said “Content: beef,” I chose to move on and ask no further questions. Ignorance can be bliss, as long as it doesn’t kill you via food poisoning–and I’m happy to report that it didn’t.

Our freezer situation was in emergency status. With the 2 arm roasts, the duck he sent us, the tablet of chicken breasts, plus other sundry large items, it hadn’t been able to house ice cream for about a year. It was getting ridiculous, and it was time to clear some space out and cook that dang arm roast. The first arm roast, that is.

Things looked promising. The meat smelled great as it browned, the oven was preheating, and I couldn’t wait to sink my teeth into the tender, falling-apart pieces of beef that the next few hours held in store for us. However, when it became obvious that the arm roast would never in any dimension of space or time be able to fit into the Dutch oven along with the carrots, onions, mushrooms, and sauce, I was forced to reconfigure my plans.

I tallied up the facts:

Fact #1: There was no way I was refreezing any part of that roast. The whole point was ice-cream space in the freezer, and we were not jeopardizing that in any scenario.

Fact #2: Forcing all the meat into the one pot would have resulted in an oven explosion that may well have brought about the end of the USA as we know it.

The simple answer to all my problems came to me in a flash:

And the one shall become two.

It was the only solution. Plus, it sounded biblical, so that pretty much sealed the deal. One roast became two roasts. I broke out my other cast iron pot (also from Big Jake’s basement) and made a second roast, improvising with some onion, some apples, some ginger, and some Asian seasonings. And that, my friends, is how I came to have two big roasts in the oven this past Sunday afternoon. Two whole roasts–for a household of two. One for me, one for my husband.

I would like to report that we will be eating roast for the next month, for breakfast, lunch, and dinner. Amen and amen.

I will be sharing the recipe for Roast #1 next Thursday, and it is de-licious. I can further vouch for it because it has stood the test of time as I have eaten it over and over again this week. In fact, I will probably be eating it tonight as well, and I’m actually . . . *honest self examination in process* . . . looking forward to it. And that says a lot about a recipe.

Have a great weekend everyone! Sleep in a little, drink a delicious coffee, and work a gigantic bowl of popcorn into your Saturday night. Or whatever floats your boat, really. This weekend, a wine tasting at our friend Cassia‘s house is going to float my boat. This weekend, a good douse of Baileys in my coffee is going to float my boat. And I may even con my husband into giving me a foot massage (conning husband=putting on a cute little alien face and smacking his butt until he agrees to whatever you’re asking) (marital advice at no extra charge).

Another Photoshop miracle: virtual lipstick tutorial

During our Family Vacay 2010, many glorious pictures were taken of all family members. But every so often, briefly, my own camera was turned on me. In some cases, this turned out to be . . . a problem. Since I wasn’t usually wearing much make-up or any lip gloss, there was nothing to bring zip to my normally washed-out look. In reality, this is fine, and I fully support make-up-lessness. However, when captured on film . . . well, that’s a different matter. My lips, for example, had very little pink in them and slightly resembled the lips of a zombie. Yes, I am very, very pale, and this can play out in both wonderful and/or hideous ways on camera.

Thankfully, I grabbed a hold of Photoshop.

“Photoshop Photoshop on the wall, make me the prettiest one of all!” I implored.

And while I didn’t become the prettiest one of all, there was a vast improvement.

I am now going to walk you through steps that will essentially add more color to your lips. I call it ‘virtual lipstick.’ Yes, it’s completely cheating the system. Probably extremely vain as well. But every now and then, I really like a picture except for the death-like lips, and hey–I’m a solution-driven person, and this is my way to make it all better.

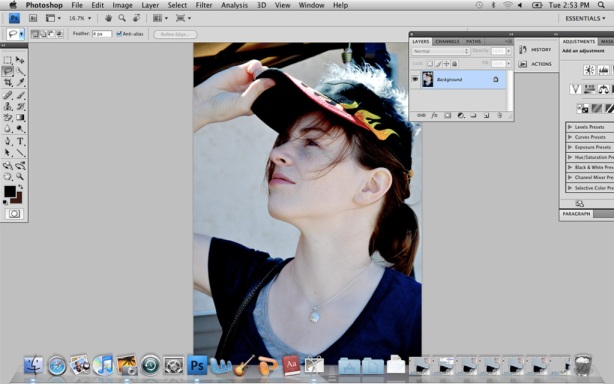
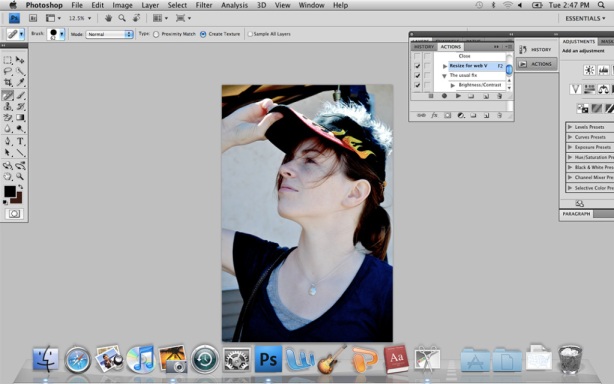
Let’s start with the picture at hand: me, at an outdoor flea market, sporting a visor cap with fur growing out of the top. Please don’t ask further questions about this visor cap. The answers can only be disturbing.

Open ‘er up in Photoshop CS4:

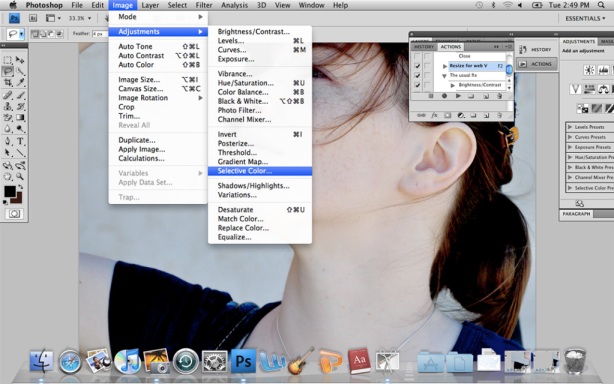
1. Using the lasso tool (indented icon to the very left, second from the top), select the lips. It does help to zoom in to the area at hand before lassoing. To do that in a Mac, simply press ‘Command +’ until you’re at your desired closeness. To drag the image around so that the lips are in the center of your screen, hold down the ‘space’ bar and use the mouse to move the image about. Oh, and please ignore my little “actions” folder on the right, where “Resize for web V” is selected. It has nothing to do with this post.

2. Go to Image —> Adjustments —> “Selective Color.” Ever since I discovered Selective Color, I’ve been using it non-stop. Non-stop, I tell you.

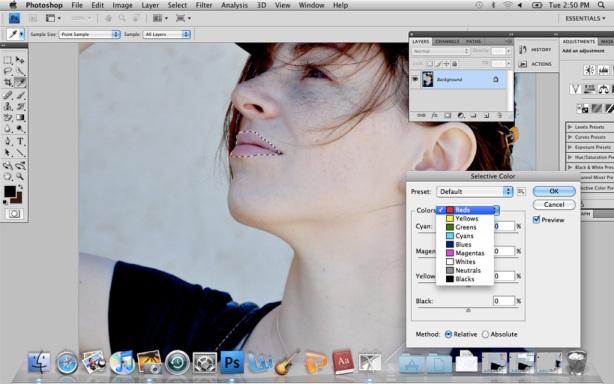
3. Now, the color in my lips is a combination of both “reds” and “neutral,” so we’ll play with both selections in turn. First, select “reds.” Essentially, we’re telling the program to take pixels that fall into the ‘reds’ category, and adjust the color in them.

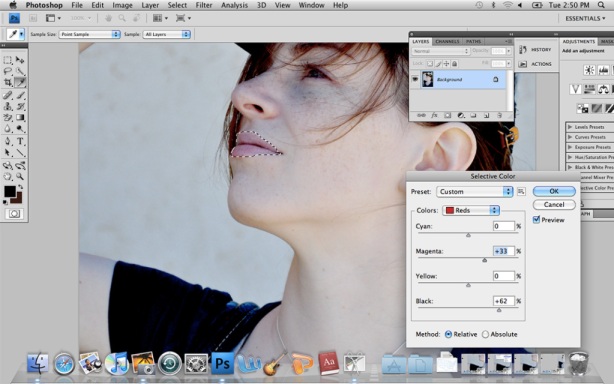
Now it’s time to play with the different sliders. As you can see, I am adding some “black” to the existing red in the selection, which essentially just makes it darker. I can also add some yellow if I want to warm up the color, and I’m definitely adding a little magenta. Mmmm.

The sad fact is that the pixels in my lips don’t qualify enough as ‘reds’ for you to see much of a difference. But wait! There is another step. And that step will be our salvation.

4. Next, I select “neutral.” Let’s be honest–that’s the color we’re dealing with.

Time to play with those sliders again, and this time I promise you’ll see a difference. Let’s add a little black . . .

Whoa! OK, not that much black!

Basically, just play with them there sliders until you have the look you want. Using this technique, the applications are countless. If you suffer from redness under your eyes, you can use this trick to select that area and reduce the “black” therein (which will essentially lighten it, though you have to make sure it blends well with the rest of the image). You can increase the “white” and reduce the “black” in the neutral pixels of your teeth. You can use it to bring out the blue in your subject’s eyes, or turn one eye red and one eye yellow–it’s up to you as Photoshop Master in Command.

After scaling back the black, adding some yellow and magenta and reducing the cyan, this is what happened:

It is to my liking. Enhanced, but still natural-looking. Amen.

Here they are side by side. If I had been a good girl I would have made side by side collage of the before-and-after pictures with a witty caption on it . . . but I didn’t. Please don’t tell Santa. The holidays are approaching fast, and I just know he’s waiting for me to slip up.

Thank you Photoshop for one more little miracle.

My parting words of wisdom to you are as follows: don’t go too hog wild. Always remember to use a light touch. You don’t want to completely lose perspective and turn a nice, innocent photo like this . . .

. . . into this :

Because take it from a woman who’s been there–that’s only a hair-breadth away from this debacle:

Eyes everywhere, lips sprouting from every available surface . . . I don’t think I’ll ever be able to sleep again. Vessie, I’m sorry I had to involve you in this mess.

Think light touch, people! Light touch!

Over and out!